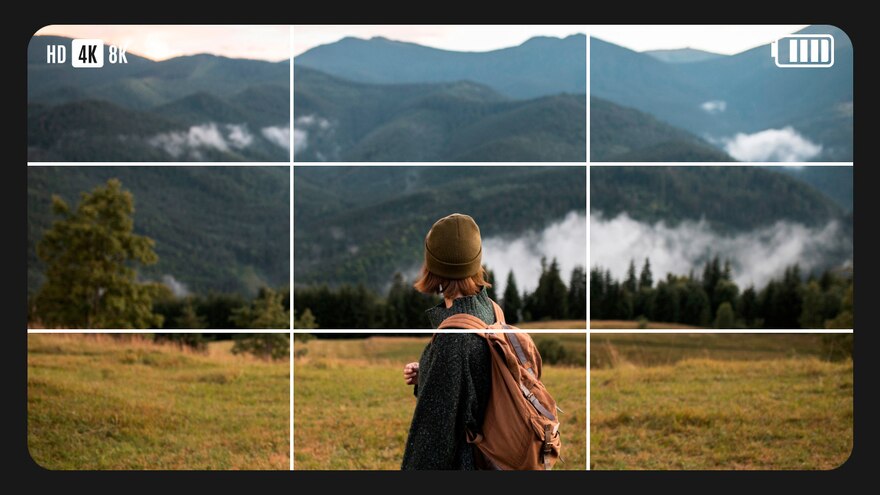
The Rule of Thirds in Photography
The rule of thirds is probably one of the fundamentals of photography, knowing it is as important as verifying that you have removed the cap from the lens before taking a photo. If you learn to use it correctly, your images will become much more powerful, and you will also see that you can apply it to all your projects. However, before talking about the rule of thirds, we must first discuss one of the fundamental questions for photography: composition.
Composition: The Basis of a Photograph
Whether it be taking a photo, making a drawing, or designing any type of visual, it is essential to know how to arrange the elements that are going to compose it within the frame, and where to place them. This is what we mean when talking about composition.
It is one of the most important points when putting together an image since it can make all the difference between making it look boring or attractive. Some of the points to keep in mind are:
- Center of interest: what is the object that I want to stand out in the visual.
- Proportions
- Perspectives
- Rule of thirds
These are just a few examples, and you can find a few more here.
These principles guide us in creating visually engaging compositions that capture attention and convey meaning effectively. As you delve deeper into mastering composition, you might also find the concept of the golden ratio. To explore this further in the realm of graphic design, don’t miss our post that delves into the intriguing role of the golden ratio in enhancing visual aesthetics and design harmony.
What Is the Rule of Thirds?
Have you ever enabled an option on your phone or digital camera that made the screen split into 9 squares? Well, my friend, that is precisely the idea behind the rule of thirds, or rather, it is a facilitator for applying the rule of thirds.
Basically, this rule is a compositional guide that divides the image into vertical and horizontal thirds, thus forming a grid. According to this rule, if you place the elements you want to photograph on the lines or intersections, the final image will have a greater impact and you will achieve better compositions.
For example, if you want to take a landscape photo and you want to capture the horizon line, try to place it on some of the horizontal lines, not in the middle of the photo.
Or for example, if you want to photograph a specific object, try placing it on some of the corners of the image, which will help draw more attention to your work.
The intersections of the lines are also important focal points, especially when taking portraits and detailed photos. You should only try to place the main elements of your images on these points (or as close as possible) so that they stand out.
Rules Are There to Be Broken
With this title, we are not promoting anarchy. Far from it!
As you can see, the rule of thirds is quite simple, and it is a powerful tool to help you achieve more captivating photographs. That said, however, you do not always have to follow it to the letter. Each image may require a different approach given that, in reality, sometimes capturing a moment is more important than following this compositional guideline. Or, depending on the image you want to create, you can even take advantage of other types of compositions like these:
- Vertical and horizontal composition: this type of image presents a predominant element that is positioned along one of the middle lines that divide the frame.
- Cross composition: this example is especially useful for creating a sense of stability.
- Triangular composition: the secret lies in ordering or presenting the elements of the image in such a way that they form a triangle. This composition is very useful for creating hierarchies between objects at a glance.
- Symmetries and patterns: something interesting about this type of composition is that they are usually very eye-catching, and it is believed that the reason has to do with the fact that it generates a certain sense of tranquility at a cognitive level.
Knowing the different types of compositions and, above all, learning to use them, will help enable us to take better photographs and even design much more impressive visual pieces. So now it’s up to you to create pieces as amazing and inspiring as the ones you find every day on Freepik.
